Saturday, September 19, 2009

Oak leaf family tr..... nevermind.

This is a bit of a confessional post: I have backed down from a sweater project, for the first time on record.

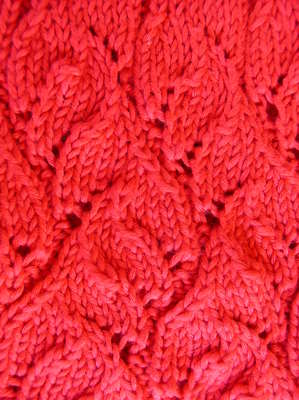
I want to make a heavily modified Oak Leaf Family Tree pullover, which centers around this amazing acorn-and-leaf cable... I've chosen some coordinating cables, I have the yarn and needles, but I don't want to do it right now. I have too much other stuff on my plate. I am, however, happy to say I've figured out my leaf technique, thanks to this swatch.


That swatch is using a different method every time a small stem branches off of the large stem, and it plays with acorn spacing and acorn decrease methods too. And leaf increases. The winners are:
  • The acorn should be 3 purls away from the main stem, not just two as the pattern has it (see the top right acorn). The extra stem movement is easily added by a single 1-over-1 cable cross on the wrong side.
  • Speaking of cable crosses, 1-over-1 cable crosses are (for me) a cleaner way of moving the little stems than increasing on one side and decreasing on the other.
  • The acorn should be closed off with a k5tog rather than a centered decrease, but it has to be tight (see the lower left acorn).
  • The best way (that I found) to introduce a new knit stitch into a 2-stitch stem as a small stem branches away is to increase an extra purl stitch a couple of stitches away from the stem, then use a 1-over-1 cable cross to move one original stem stitch away to form the new smaller stem; as the extra purl stitch crosses underneath, it turns into a knit stitch. Everything stays tight, and continuity is maintained between the small stem and the larger one (see the topmost branching).
  • My favorite double increase for the middle of the leaf is k1, leave stitch on needle, k1 into stitch below, k1 into the first stitch again. This leaves a "vein" in the middle (see the left upper leaf).


I'll want these notes, probably next winter. I've decided that since I'm using the same yarn I used for the Hourglass Aran, I'd be wise to wait and see how that wears during its first season. There may be things I'll want to adjust for as I prepare to make this next fancy cabled sweater.

In the meantime I'm enjoying knitting up someone else's cleverness, as well as designing a simple (but small-gauge) anniversary sweater for my husband.

Saturday, September 05, 2009

Swirled Pentagons: mission accomplished

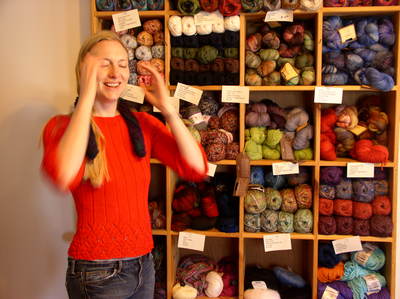
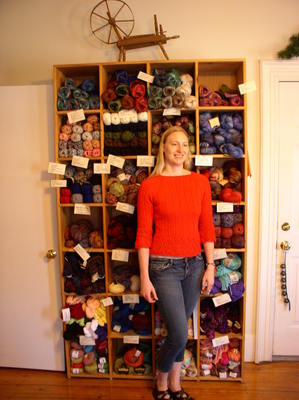
I finished this sweater weeks ago, but only now has it been cool enough to put it on for five minutes and ask my husband to take a photograph. As you can see, it fits but is in need of blocking:


I have nothing to say about the completion of this sweater except this: oh my god, so much stockinette, never again! never never never!

My modifications:
  • Like others (including grumperina), I got the right gauge and size on the pentagons by knitting them with size SIX needles instead of size NINES. While there is nothing in the errata about this, I am convinced there is in fact a mistake.
  • I made the ribbing on the body 2.5” long to match the cuffs.
  • I also made the whole body about 2” longer than the pattern called for.


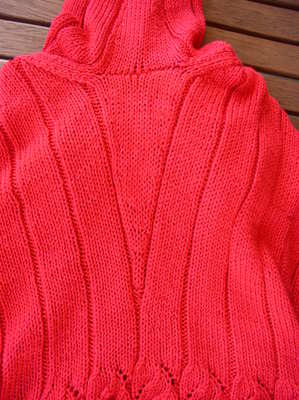
The arms are a little tight -- not so tight that I won't wear the sweater, but tight enough that I can't wear a long sleeved layer underneath. I like it, but a bit less than I was hoping I would; I liked the way the pentagons came down over the shoulders of the model in Knitting Nature and was sad when I found out that sweater was way too big for her. Nonetheless, this fits and is shiny and nice. The best part is the back of the yoke, so I'll be sure to wear my hair braided with this so that people can see it.

Sunday, June 28, 2009

Seven and a half little coolie hats

It took a lot of swatching to get going on my latest project. Along the way I made a little coolie hat for the stuffed bookworm given to me by my good friend Bree:


It took me a long time, and I did a fair bit of trigonometry regarding pentagons, before I figured out that the coolie hat would block flat with no problems. Then I went on a business trip, knitted LOTS of little coolie hats and got them wet and smashed them:


Yes, it's the Swirled Pentagon Pullover from Knitting Nature, a sweater I've liked since the day I started knitting. In comparison to the Overdose Aran, it seems deliciously simple and likely to go very, very fast. I also adore my yarn, which is Valley Yarns Colrain in majestic blue. It's shiny, which brings out all the wild swirling these ribbed pentagons have to offer, and was used by both my favorite instantiations of the pattern on Ravelry.

I loved these pentagons, people. LOVED. Perhaps the most delicious part was picking them up from each other; the directions specified using a long-tail cast-on, then picking up stitches using alternately the working yarn and the tail when it came time to pick up stitches. Something about this fiddly process had me utterly charmed, maybe the neat twist made by the two yarns on the back, or the way the pentagons so cleanly line up knits with knits and purls with purls.

One peculiar thing about these is that I eventually got gauge on them using size 6 needles, making me wonder how the directions (which call for size 9s) could possibly be right. I think that number may be upside-down. The great Grumperina had the exact same suspicion a while ago, but the errata are silent on this matter, so this will have to remain a mystery. All that matters is that she fixed hers and I fixed mine. I'm hoping to get away without altering the sleeves and body very much.

Saturday, June 13, 2009

The very last Hourglass Aran post

This is it... at long last, the FO pictures. :D


I'm certainly glad that my in-house knitting critic approves.

Saturday, June 06, 2009

All over except the final photo shoot.

O HAI INTERNETZ. Guess what is finished? My ridiculously complicated Hourglass Aran. These final pictures of the construction were taken this morning, before washing it; I knew how much this yarn changes when the oil from the spinning comes out of it, and wanted crisp pictures. After the photoshoot I washed it in the bathtub, where it fluffed and softened mightily... so once it dries you can expect one more blog post with pictures of it actually ON me.

Nice detail #1 is how the sleeve underarm area has a gusset, which continues a line between st st and reverse st st that starts on the body where the side panels meet the front and back panels. Maybe nobody will ever see this or know about it except me, but it makes me kind of happy.


I twisted the central cable in opposite directions on the two sleeves.


And, lastly, a shot the shoulder from above, which shows the braided mini-saddles and also the beginning of the closed cabling on the sleeves. I'm very happy with this; it turned out as planned. At one point I wanted to do a different and more organic transition between the saddle and the sleeve cables, but that will have to wait for another sweater. :)

Sunday, May 03, 2009

It's hard to get luckier...

I am always confused by knitting sleeves... they just go ON and ON and ON until suddenly they stop. So for most of this sleeve, I was sure the pattern could not end gracefully and I'd have to just run it straight into the ribbing; but in the end, it could. Check out how lucky I got:


So, I win. One more sleeve. :)

Saturday, April 18, 2009

Hourglass Aran sleeve design

After some tribulation, sleeve #1 is long enough to show you.


The central cable is a (slight) adaptation of No. 46 from Annie Maloney's Cable Knitter's Handbook, the next cable out is my own, and the texture stitch is... um, I can't find which book it came from anymore. It's probably called "little honeycomb", and if you like doing 1-over-1 cable crosses this stitch is for you. :)

I made my life unintentionally difficult by wanting to do a shallow set-in sleeve from the top down. The faster I could increase stitches, the shallower the set-in... but it turns out that there's a limit to how quickly a person can do increases, and it's hard to even hit that limit gracefully. In the end, I begged for help on Ravelry, and this is the wisdom I came away with:

To increase 1 stitch on each side on every row, just do a yarnover for the increase -- you need that extra yarn in the fabric so that the edge (diagonal) stitches can be longer than the other stitches. Twist each yo on the next row to close the hole.


You can see in the upper right of this closeup that I got it working pretty well.


You can also see that I did a gusset rather than do the texture stitch all the way across. Decreases actually continue at the same rate after the gusset; it's just a visual feature more than a shaping one. I could have done without the fake seam, with a bit more planning, but joining in the round left me with a one-row jog in the pattern from one side to the other.

Finally, here's what the sleeve will eventually look like from the front when being worn:


Yeah, the cap wound up a bit trapezoidal, but I think it won't show much.

I already know it will be annoying to set these into the sweater body. I'm thinking of trying to do it using backstitch and a dressmaker's technique, explained here on Ravelry by Annie herself. But first things first: I need to finish the forearm, figure out how to gracefully end the central cable (which I'd like to close off) and do the cuff. To say nothing of the dog the second sleeve.

Sunday, February 15, 2009

A new technique for starting closed cables

Ever since I started knitting cables, I've been looking for a flatter way to start closed cables for those cases where a rounded beginning is desired. Now, I'm happy to present a new technique whose beginning is both flat and full. One right-side row, you haven't started your cable; the next right-side row, you have two 2-stitch cables that are already separated by four purl stitches.

Here's what it looks like, along with an initial try at a matching decrease.
Before blocking, a circle:


After blocking, it's actually a bit wider than it is tall:


How is that possible? The core of the new technique: it relies on short rows to create the bulk at the bsse of the cable, rather than relying only on added stitches. It should probably be called the Bobble Method, because that’s what I was thinking of when the idea was born.

Directions


On a wrong-side row (on which you’re working knit stitches):
  • Purl into the front and back of 2 consecutive stitches.

  • TURN THE WORK. Knit those four stitches.

  • TURN THE WORK. Purl those four stitches, then continue knitting to the end of the row.


On the next row, a right-side row, perform two cable crosses when you get to within 2 stitches of the lump of knit stitches:
  • Cross the first two knits over the two preceding purl stitches

  • Cross the other two knits over the two following purl stitches


Pros and Cons


What’s good about this method (and by good I only mean it satisfied my goals), is that it doesn’t depend on crazy increases: it adds bulk directly to the very base of the cable via a couple of extra short rows, and adds only 2 new stitches. As a result, it disturbs the underlying fabric less than a technique that depends on making 4 new stitches. In addition, the 4 stitches in the new pattern are well established before they're pulled hard apart, so that no hole is created when that happens.

Caveat: this is probably best for making cables that do quickly separate to place 4 purl stitches between the new knit columns, since there is a gap naturally formed on either side of the initial short rows that is hidden by (and helps to accommodate) the 2-knit-over-2-purl crosses that move the cables apart from one another.

Caveat #2: it's hard to chart. :P

Why I had to invent it now


I needed something new for the Hourglass Aran I'm designing: a sweeping, luxurious entry into a cable of Annie Maloney's, to go on the sleeve cap and lead the eye downward. (If you like the cable, it's an adaptation of No. 46 from her Cable Knitter's Handbook, a book I highly recommend to any cable enthusiast.)


My thanks to TECHknitter over at TECHknitting, who had nothing to do with this technique, but who first got me thinking in terms of "how can I put more yarn in this particular spot?". I hope this is helpful to those of you out there designing this style of cable.

Sunday, February 08, 2009

Hourglass Vest

Have you been wondering whether my crazy sweater-construction idea with the shaped cable panels was going to work at all? Yeah, me too. :)

It works...


Here's a side view (impossible to take this one without distorting the fabric of the front and back rather a lot):


Here I am looking smug, perhaps because instead of a handful of pieces I suddenly have a functional Aran vest. Or perhaps because it was windy out and I was squinting.


If you look at the sides, you can see I got bitten a little by the rows of plain reverse stockinette stitch on the side panels, which have a larger gauge than the cabling and caused the ribbing there to actually pull in. Though that's annoying, I think it'll block right out when I wash this and is not worth fixing in the knitting, at this point.


Now, onto the next huge challenge -- sleeves. I left a generous armscye in this sweater body, which make it very comfortable as a vest (I'm still wearing it as I type this!) but now need to be accommodated.

Sunday, January 11, 2009

Justa Scarf

With my sweater design coming along pretty well, I decided I was up to trying a scarf. :D Here is Ralph, sitting pretty in 100% chunky baby alpaca.


31 stitches across, 50 inches long, 2 skeins of Baby Chunky Alpaca Paints from Mind's Eye Yarns. I think this stuff could make a process knitter out of anyone. I think I was drooling the entire time I knitted it up. Not my usual style at all, but considering that I lost my old scarf, I had no choice but to give in. ;)

The Justa Scarf is just a scarf; I cast on 31 stitches and knitted 1x1 rib until I ran out of yarn. The only chances I got for that knitterly extra touch were the ends. Both are done nicely with special techniques for 1x1 ribbing:


I was having a little too much fun reinventing the Kitchener stitch from first principles, and managed a sort of purl Kitchener first:


Though I picked it out in order to do a normal graft, I do think it's kind of a cool edge, both decorative and with all the stretch of regular grafting. I might keep it in mind for some other time.

Friday, January 02, 2009

OMG applied I-cord


The sweater's neck is done, and applying I-cord to bound-off edges is my new favorite technique. I wish I had a before-and-after picture of the back of the neck -- it really went from ragged to gorgeous in about 30 minutes. Not only was the technique pretty easy (I did it based on instructions in The Knitter's Book of Finishing Techniques) but it matches the rolled edging on the sides of the V-neck perfectly.

There's slight unevenness on both right and left sides where the I-cord meets the rolled edging, but I'm not going to stress about that. After I wash this and the yarn fulls, I don't think it will matter.

Sunday, December 28, 2008

Hourglass Aran construction plan

In response to some questions on Ravelry (eightoclock, have you lost your mind?), I put together the following badly Photoshopped picture to show how the side panels are meant to fit with the body panels to give me a completed sweater (and a svelte waist).


After doing this I finished knitting the swatch of the side panel motif, and it does look nice like that with the vertical symmetry. I'll probably do that for real.

Then I went to the gym:


The design process requires flexibility, you know.

Friday, December 26, 2008

Hourglass Aran progress

Oh, I am so slow, but the whole front is done now. I couldn't get the colors right, so finally just made today's pictures black and white. Here's the front, and the start of the back, which shows the completed neckline shape and also the ribbing I chose. They are baby cables, basically k2p2 ribbing with a tiny k-over-k cable cross every fourth row. It doesn't really pull in any more than my cables, which are close to k2p2 anyway, so I don't think it'll contract unflatteringly.


And here's the fun part, a swatch for the side panel, which I've been thinking and thinking about today. This is my second attempt and at least it's shaped correctly so far, but it's still too wide... I need less reverse stockinette on either side of most of the cable design.


As I said on Ravelry if not here, the side panels are why it's an *hourglass* Aran. They provide waist shaping and the chance to do some freeform cable design, all at the same time. :) And they are insurance, too... if I have the size wrong, I should be able to adjust by reknitting just the side panels and not the whole body.

The bad news (and this is bad news for my sleeve caps, too) is that doing closed cables and controlling the shaping of a piece at the same time is kind of hard. When the cables first begin, they don't really affect the width of the piece at all and you can basically ignore the new stitches, as though the cables were floating on top. Sadly, as the cables spread out they do inevitably change the stitch gauge from the initial stockinette gauge to the "gauge over lots of cables". Worse yet, as this piece starts to taper in, some of the decreases come from the edges and some come from cables melding together. I'm starting to have a lot of thoughts about things that affect gauge, and I'm coming to the conclusion that stitch count matters, but so does the number of knit-to-purl transitions across the fabric, and so do cable crosses.

I haven't finished the bottom half of this yet, partly because I haven't decided whether to just do the top half in reverse (with a couple of small adjustments) or whether to make a different pattern. I'll probably just do the top half in reverse, considering that this rather pretty bit will otherwise only be visible when I raise my arms! And I'd probably look weird, wandering around the city with my arms over my head.

Sunday, November 02, 2008

Beyond the lace-only stereotype

People are always taking backlit pictures of their lace shawls, but I was holding my sweater up to a window lately and noticed that cables have their own beauty when seen the same way.


Progress is slow. I took a vacation last week and thought I would knit a lot, but I ended up reading instead: Anathem by Neal Stephenson, The Graveyard Book by Neil Gaiman and The Time Traveler's Wife by Audrey Niffenegger.

Wednesday, October 15, 2008

Touched by a Harlot!

The Hourglass Aran had a brush with fame tonight:


Yes, Stephanie Pearl-McPhee actually touched it, offered to hold it up even, but I had already gotten this super-cute picture so I declined the kind offer.

I've never seen the St James Episcopal Church so packed with people as it was for Stephanie's talk. (Must you really point out that I'd never been in the St James Episcopal Church before at all?) I got to meet metak again, which was nice, and it's hardly her fault I have a lousy memory for faces, but failed to find Vicki in the crowd. And... it was fun. I have been somewhat lukewarm about the Yarn Harlot at times, but I REALLY enjoyed seeing/hearing her in person. The downtime and the laughs were valuable, and frankly? It turns out she has an incredibly great voice. I could have listened for hours.

Here is some better detail of the Hourglass Aran in progress -- actually, it's a photoshopped version of the swatch, which has now been entirely unravelled and redone.


As might be obvious, or not, this is a V-neck sweater front, worked from the top down. That means that when I'm knitting it, it's held upside down. (Duh.) At the Yarn Harlot festivities tonight, two, yes two different people asked if I was knitting a baby jumper.

Apparently the two halves of the V-neck look like pudgy little baby legs.

Wednesday, September 17, 2008

Transitions

I've been spending my knitting-time on design lately, and design is a slow beast to ride. I love it -- designing and creating is what I do, in general -- but it also involves more ripping out and less visible progress than I sometimes like.

It, or maybe the giant CONE of wool I'm designing bits of Aran goodness with, have also pushed me toward nonmonogamy. Here is what I've done with the two skeins of Noro Transitions I bought:


Sleeves, in a simple lace pattern lifted from part of an Interweave Knits pattern somewhere. (Note the small wad of zombie-flesh-colored yarn I removed from both skeins just before the sleeve caps.) I like these sleeves, but they do seem to lack something. What is it? Oh yes, a body. These sleeves were meant to be a shrug. Damn. So I've bought some gray chunky cashmerino to deal with that, but the sleeves hibernate while I get on with my real obsession lately...

What is it? It's a swatch, but it's a swatch of the one thing I started knitting for... a custom-designed Aran. You're looking at [a swatch of] the right side of the front, where I've tested the way my cables grow out of the neckline.


Things I know about the design so far:
  • It will be done top-down, FLAK style, starting with narrow plaits acting as mini-saddles.
  • It will have set-in sleeves, also top-down but probably just sewn in rather than done with short rows.
  • From outside to center, the cables are
  • The V-neck really will have a simple rolled-under edge, since that puts the emphasis on how the cables grow out of it.


I'm happy to leave some of the design for later in the project. I have ideas for the sleeves and the side panels that I'm hoping will be good, though. This sweater may or may not be a tour de force, but it will be a tour de as much force as I have. This is the thing I've wanted to be working on since pretty much the day I picked up needles.

Wednesday, September 03, 2008

Celtic Spiral Cable... Scarf Pattern

I've charted out a cable, inspired to do so after looking at a sweater called Durrow and wishing its cables had just a bit more continuity. It's a transcription into cabling of a pattern on page 33 of Celtic Art: the Methods of Construction by George Bain, which I've had since I was a kid. (There are others in the book I'd like to try charting as well, but not until I see what's in the new Melissa Leapman book on closed cables that comes out next month.)

Here's the chart:


And here's the knitting:


It's a large repeat, but I'm happy with the way it knits up. For people looking closely: the top repeat in the photo is a perfect reflection of the chart, the lower repeat is not. Also, though I know it's a bit of a beast with a lot going on, it *is* well-behaved in that cables only move, cross, are formed or decreased on the right-hand sides. The over/under weave is regular as well.

I want this to become my first contribution to Ravelry, but they're not quite ready to handle stitch patterns as separate entities. So here is the (ahem!) pattern for a Celtic Spiral Cable Scarf:

  • Using any yarn and any needles that will provide good cable definition, cast on 31 stitches (17 for the cable, 4 more for a 2-stitch rev st st border, and 5 stitches of garter stitch on each side).
  • Work 10 rows of garter stitch.
  • Working a 7-stitch border on each side as described, work 6 cable repeats.
  • Work 10 more rows of garter stitch and cast off.

I think this cable, along with its mirror image, and maybe a horseshoe cable in between them, could also make a great sweater front. :)

Sunday, August 24, 2008

FO: Chinese lace pullover

Pattern: Chinese Lace Pullover by Angela Hahn
Yarn: Eden Madil 100% bamboo
Size: Small, with adjustments to the shoulders
Needles: Size 4 Knitpicks
Construction: in the round where possible, bottom-up, but I sewed the raglan seams as directed by the pattern.
  
Here, the sweater and I are wondering whether anything can be better than knitting AND coffee together.
Then we went back to the yarn's origins at Mind's Eye Yarns in Porter Square. The ribbing on this sweater really lends itself to weird pixellation at some .jpg settings -- weird! But here we are. (It was fun to pose here, because I knew anyone looking out the windows would know exactly what we were doing and why.)
We went in to see Lucy and her new yarns, which may have been a bad idea. Yarn fumes!! (That hank of yarn around my neck has a really high cashmere content, just so you understand.)
Lucy really does have some lovely new yarns. Way down in the bottom right corner you can see some of the bamboo the sweater was made from, but all the newer stuff is for fall/winter.
Then, home for closeups. The place where I found the pattern least clear was probably the directions on the body/sleeve increase area. Here is how I did it: lifted increases one stitch away from the edge of the expanding region. I did lifted increases because this yarn was incredibly unforgiving, and it was the least visible least disruptive increase I could find, and I did them near the edge instead of always at the center so that the whole section would appear mostly vertical instead of all flaring out from a central line. One last minor detail: after the armpit bindoffs I had 3 stitches left from this new rib on either side. I kept it that way as I did decreases, ending up with 2 visible stitches on each side of the raglan seam -- a minor variation from the pattern which calls for 1 on each side.
A closeup of the lace, where I didn't deviate from the pattern at all:

But what about those shoulder adjustments? Sorry, I couldn't get a good shot of them. Basically, to kinda-fit my square shoulders I had to add both width and height, so I have a few increases and a few short rows. I decreased away the increases after the short rows. I hid all the short row turns in the purl parts of the ribbing, which was a good idea, but I did the wrap-and-turn method, which left pretty visible wraps on the surface. Maybe if I hadn't done the wraps and left little holes instead, it might have gone better with the pattern... it does have lace, after all. But the wraps are a very minor flaw in a sweater I'm otherwise happy with, so meh. :)

Finishing: did I mention this yarn is unforgiving? It also frays like an 18-ply mofo. So, I dipped the end of each end in a thin solution of fabric glue and water a day before weaving them in, to stop the fray. It may have been overkill, but I'll sleep better at night.

And the future? Bamboo stretches, you know. I'm actually counting on it to grow a bit. I'll try to post a follow-up picture in a few months when I've been wearing it for a while.

Thursday, August 14, 2008

Fables of the construction

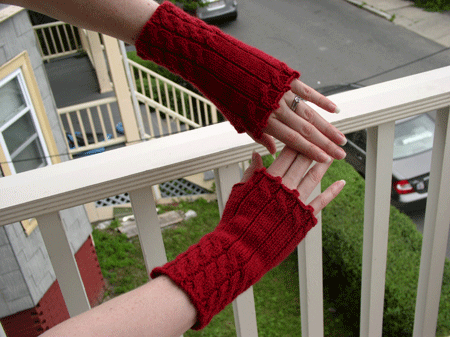
Ever seen this pair of fingerless mitts before? Yes, here is yet another one of the 6783 instantiations of Fetchings that people will admit to on Ravelry. I'm sure there are twice as many in the wild. Still, my mother likes these. I knit them up in 3 days for her birthday, and felt very competent doing them. :)


And, here is one of those pictures only a knitter can love. It's blurry on purpose -- I'm trying to get you excited about the NEXT post. And yes, that is a ball of yarn on my head. ;)


In between my monotonous chants of "never making a raglan again, never making a raglan again" I've been having a bit of fun with scraps. I finally learned the long-tail cast-on and an invisible caston for 1x1 rib, and have come up with a simple lace pattern to use with the Noro Transitions yarn that flew into my mailbox after I heard about it. This crazy-ass yarn changes fiber throughout the skein, always a wool blend but transitioning also between silk, cashmere, angora, alpaca, kid mohair and camel. I had to have it.

Also in the mail to me right now: Knitter's Guide to Stitch Design by Annie Maloney.

Sunday, July 27, 2008

A torso and two wrists

"...that's all we could find of her, Sergeant. In pieces. I haven't seen a case this nasty since '73!"

Here's the completed body of my Chinese Lace Pullover. I did it according to pattern (with the TINY modification of doing my decreases one stitch in from where the instructions called for).


And here's the lace part of the sleeves, all done:


Innocent-looking, huh? Looks like I'm doing them two at once on Magic Loop, huh? Actually, the bamboo yarn was so slippery that the only way I could cast on in the round was plastic DPNs, and after a few rows of that the only way I could bear to keep going was Magic Loop. Each sleeve has seven repeats of the lace panel, so I kept 4 on one side of the loop and 3 on the other; it seemed to work fine that way. Now that I've gotten to the plain ribbing, I've transferred to a longer needle for continuing them both at the same time.

The sleeves are not going to go according to pattern. For one thing, since raglans don't generally fit well on my square shoulders, I'm going to add some short-row shaping; for another thing, the pattern calls for the upper arm on these babies to be HUGE, 14" for the small size. Investigation shows it's because each sleeve is expected to have as many increases as each side of the body does.

No wai!!!


So it's time for some mods. I know the pattern is cleverly written so that the body ribbing lines up with the arm ribbing along the raglan seams, and I want to preserve that, so I'm busy doing the math for a smaller-but-still-clever sleeve. I think I have a plan. :)